Sunday, April 17, 2011
Mech Rigs + Tool Writing
I've recently joined the Angels Fall First team as an animator, which is turning out to be a lot of fun already. I enjoy animating, but I love rigging and scripting, which is good since my first set of jobs are to rig (and eventually animate) the first big mech, the Velius Mk2, as well as some of the first-person arms and weapons. It's been a while since I've done any hardcore 3D work, so I've been shaking loose the cobwebs and getting back into my groove.
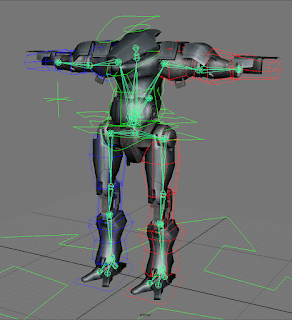
For the mech, I was given the in-game mesh weighted to an older version skeleton, but it was missing any sort of controls, and the existing animation had been baked down onto the bones. After looking the whole thing over, I scrapped the animation, detached the mesh, and went to work improving the skeleton. The original structure was mostly acceptable, but I added in some extra degrees of motion for the hips, torso, and neck, as well as bones for the toes. I also added in some bones which will be be used in-engine to facilitate the destructible armor plating.
Once that was finished, I weighted the mesh back onto the skeleton so it could move around. Weighting mechanical objects like a mech is a fairly easy process, since most of it simulates rigid binding, but it can still be tedious.
I then duplicated the skinned skeleton to provide a base for the control skeleton. My thinking was that by separating the control structures from the skinned skeleton, I could re-skin the mesh or fiddle with the rig controls without affecting the other too much. The two skeletons are exactly the same, except that the control skeleton has two sets of arms and legs to allow for IK and FK control sets.
Of course, a control skeleton isn't very useful without control objects for the animator to manipulate. Most rigs I've used in the past stick to NURBs curves for the controls, but I decided to mix and match. I'm experimenting with doing super-low-poly versions of the limbs instead of control curves because they are easier to spot and easier to click on. The arrow control curves were objects that I created quickly in Illustrator, saved as Illustrator 10 files for compatibility, then imported into Maya
With the control objects built, I now need to hook them up. The IK controls will be a little tricky, but FK controls are about as straightforward as you can get. However, connecting everything by hand takes a long time, so I wrote a little script to speed things up. All I have to do is select my control object, the joint I want to connect it to, and run the script. What it gives me is a control surface completely oriented to the joint with all its translation, rotation, and scale channels zeroed out. This gives the animator a nice, clean base to start with.
In all, getting to this point has taken me about a day and a half, and I loved every minute of it. I spent almost my entire weekend working this up because that's what I like to do. I'll post more shots as I finish it up. Also, go check out the Angels Fall First site! It's got a lot more cool stuff to look at!
Subscribe to:
Post Comments (Atom)


No comments:
Post a Comment