NavBar

Showing posts with label maya. Show all posts

Saturday, April 28, 2012

Moar Chubs

I've been plugging away at the Chub model over the past two weeks or so, and here's what I've got to show for it:


It's been an real learning experience, trying to get this whole thing set up. I've learned a few specific lessons very clearly.

1) Build a library of modeling bits to pull from.

It took me several days to export, clean, and polish each of the LEGO pieces from the CAD programs I found online (MLCAD, LeoCAD), but once the legwork was done, it was extremely easy to fiddle around with building new things. I can only assume that creating a similar library of frequently used shapes/items would be hugely useful to any modeler.

2) Mechanical joints are a pain in the patootie to rig for IK.

The human hip and shoulder each have three axes of rotation all centered on a certain joint area (clavicle/scapula/humerus for the shoulder, pelvis/femur for the hip). LEGOs, being mechanical objects, are not so nice. The equivalent joints on the Chub have the same three axes of rotation, but they are separated into three separate joints, each of which can only rotate along a single axis. Maya doesn't like this. In fact, if you try to set up those joints, limit their rotation, then try to put an IK chain on it, it's more than likely that Maya will just throw up its hands and go "Screw you buddy. I'mma rotate them joints however the hell I feel like!" And then your rig will go crazy.

This can be sidestepped by creating a separate 3-joint IK chain with which to drive the skinned joints. Even so, I've found it to be relatively unpredictable.

3) LEGOs are not meant to animate nicely.

I love the designs of the Frames I'm seeing from Mobile Frame Zero. They look phenomenal. I have very quickly realized, though, that LEGOs just can't be made to animate the way I would like them to. My two tentative solutions to this are to either create my own custom LEGO joint pieces for things like hips/shoulders, or to take these designs as inspiration and create 'real' versions of them. Obviously the second option will take significantly more time and exploration, but it could also yield some really cool work.

------

I think I'll be putting this project aside for the time being, though, so I can work on a new project that has just recently become available to me: home mo-cap. I went to the East Coast Game Conference last week, and won a Kinect from CineSys Inc.'s booth. I've been wanting to play around with mo-cap over the last few months anyways, but I don't have the money to shell out for the hardware. Now that I have it, though, I'll be working on figuring out how to get it up and running with MotionBuilder. Fun times ahead.

Monday, April 16, 2012

Got Chub?

I love mecha, and I love legos, which is why I REALLY love Mobile Frame Zero: Rapid Attack and gave them some money to make awesome stuff. In fact, I love the idea so much that I'm working on building some of their mechs in Maya. I'll write more about it later, but here is a work in progress render to tide you over until I get something more substantial finished.

Saturday, September 24, 2011

Surgery and Cathedrals

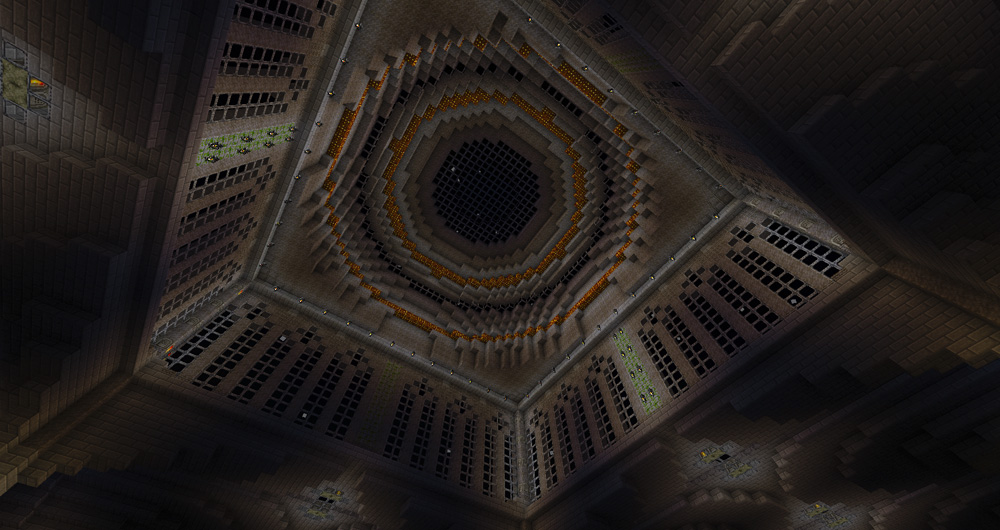
I had oral surgery last week (soft tissue graft so my molars won't fall out), which meant a lot of sitting at home with a lot of extra time on my hands while the drugs messed with my brain. Of course, I did what any other reasonable person riding a Vicodin high would do: I built a cathedral in Minecraft.

Now, I did use a very nice program called MCEdit to take care of most of the repetitive work, so it's not like I mined, crafted, and built this entire thing by hand. I did a ton of planning on graph paper, especially how to handle the various curves. All of the detail-work and parts-building was done in Minecraft proper (using the nice "new" creative mode), but I then used MCEdit to copy/paste/shift the bits around. I'm still not finished, but I figured I have enough so far to pique some interest.

There's also a catacombs level which leads to a large cavern that I'm not sure what I will do yet. I don't have any screenshots of those yet. Not that it would matter, since the catacombs are so dark that you can only see about 5 blocks in any direction, thanks to the darkening effects of being placed just over the void.
 
A view from the nearby NPC village
An external view of the sanctuary
Pretty lights at night!
Before I finished the sanctuary wall...
Main hall at night

Dome at night
A view from the pews
The sanctuary at night


Perfect view of the sunset

Sneak Peek

I've been working on a large-ish side project in my free time over the past few weeks. Here's a little preview.


Monday, May 9, 2011

Gun Rigging

Quick update on what I'm working on! I'm now working as a pixel animator at Mighty Rabbit Studios here in the Triangle area, so I will be delving into more pixel work on here in the near future.

The Angels Fall First project is progressing well, too. The finished mech rig has been put aside for now so that I can do a full overhaul on the first-person arms and weapons.

The arm rigging is pretty nuts right now. The original meshes were created using a poly-decimator, which basically takes a hi-poly mesh and tries to create a low-poly version while maintaining the overall surface shape. The problem is decimators don't create clean topology, and messy topology looks crappy when it deforms. Thus, I've had to re-topo the hands and try to fit them all to approximately the same proportions, with a marginal degree of success. I hope to explain more in a future post.

My latest work, tho, has been on the gun rigs. I've got a ton of awesome weaponry on my hard drive, and I've been having a ball working on getting it all set up to animate. I took one of the assault rifles all the way thru to a finished rig so that I can start testing thing out in-engine soon. Here's a short demo vid:


This rig took a lot more work than I'd expected. It has a lot more moving parts than most guns (sometimes all you need is 2 bones: grip and magazine), which was work enough, but the real challenge was making the switchable pivot points. I tried a number of different methods, but the eventual solution ended up being pretty simple.

At the core, it's a variation off the simple IK/FK triple-skeleton switching system. I have two skeletons for the stock and grip which drive the main control skeleton. One skeleton is rooted at the stock, the other at the grip. The main body control houses the attribute which switches between the two. Ideally, I'd like to set up a script that will allow for matching between the two versions. Way down the road, I'm hoping to write a GUI that would allow the animator to switch out weapons on the fly and do other nifty tricks, but that's gonna take a lot more planning and work.

Alrighty. That's me for now. If things go well, I should have moar soon! :D

Wednesday, April 20, 2011

PyMel

I print tshirts for a living, and that means that a good chunk of my work-day is spent waiting for the machine to spit out the next shirt. It gets pretty boring if I spend that time just sitting and waiting, so I get on my laptop and do useful things instead. This week, for example, I started to look into using PyMel for some of my scripting needs.

To get everyone up to speed, Maya uses its own embedded scripting language called MEL - Maya Embedded Language. It's a good start for learning how Maya works behind the scenes, but it is rather rigid in its structure, and has a tendency to be very very verbose.

Newer versions of Maya have begun to include a Python runtime as well as a library which ports all (most? I'm not 100% sure) of Maya's MEL commands for use in Python. This essentially allows you to write MEL code while taking advantages of some of Python's nicer features: dynamically typed variables, more refined string manipulation, and not having to check every freaking line of code for the one semi-colon you missed that's causing your whole script to break. However, it still requires you to think largely in more of a MEL-type flow, which ends up feeling like a half-baked hybrid that nobody really would want to look at.

That's where PyMel is intended to come it. From what I gather, PyMel is designed as a more Python-y integration of Maya commands into Python. Honestly, I don't have enough experience to say for sure, but at first glance it does seem to be an improvement. I will add one caveat: it appears that others more experienced than I have a less-than-enthusiastic opinion of PyMel, primarily because they have found it to become excessively slow for large iterative tasks. However, since I'm writing small helper scripts rather than full-on tools, the speed differences have so far been indistinguishable. (As a final aside, a brief websearch indicates that PyMel is faster overall for scripting control, but it is faster to then switch to the Maya.Cmds functions for iterating large loops.)

Anyways, why is all this important? Because I'm a perfectionist and a minimalist (usually within reason). I like to do as much as I can with as little as I can get away with. For example, why write 5 lines of MEL code when I can do the same thing with 1 line of PyMel?

//Parent constrain lower-level control object's zero-group to higher-level control object
//MEL Code
string $OA_ctrl_parent_selection[] = `ls -sl`;
string $parent_ctrl = $OA_ctrl_parent_selection[0];
string $child_ctrl = $OA_ctrl_parent_selection[1];
string $child_group = "GRP_" + $child_ctrl + "_zero";
parentConstraint -mo $parent_ctrl $child_group

//Parent constrain lower-level control object's zero-group to higher-level control object
//Python/PyMel Code
parentConstraint( ls(sl = 1)[0] , "GRP_" + ls(sl = 1)[1] + "_zero" , mo = 1 )

I'll be the first to admit that the PyMel snippet is much more difficult to decipher, but ultimately it's going onto my shelf as a button anyways. I'm also working on translating to PyMel the script I talked about in my previous post, but it's still a work in progress. In the end, though, I just really love writing these bits of automation to make my life easier. My rigging is already getting faster just by reducing the number of operations I have to execute to get the same results.

Sunday, April 17, 2011

Mech Rigs + Tool Writing


I've recently joined the Angels Fall First team as an animator, which is turning out to be a lot of fun already. I enjoy animating, but I love rigging and scripting, which is good since my first set of jobs are to rig (and eventually animate) the first big mech, the Velius Mk2, as well as some of the first-person arms and weapons. It's been a while since I've done any hardcore 3D work, so I've been shaking loose the cobwebs and getting back into my groove.

For the mech, I was given the in-game mesh weighted to an older version skeleton, but it was missing any sort of controls, and the existing animation had been baked down onto the bones. After looking the whole thing over, I scrapped the animation, detached the mesh, and went to work improving the skeleton. The original structure was mostly acceptable, but I added in some extra degrees of motion for the hips, torso, and neck, as well as bones for the toes. I also added in some bones which will be be used in-engine to facilitate the destructible armor plating.


Once that was finished, I weighted the mesh back onto the skeleton so it could move around. Weighting mechanical objects like a mech is a fairly easy process, since most of it simulates rigid binding, but it can still be tedious.


I then duplicated the skinned skeleton to provide a base for the control skeleton. My thinking was that by separating the control structures from the skinned skeleton, I could re-skin the mesh or fiddle with the rig controls without affecting the other too much. The two skeletons are exactly the same, except that the control skeleton has two sets of arms and legs to allow for IK and FK control sets.

Of course, a control skeleton isn't very useful without control objects for the animator to manipulate. Most rigs I've used in the past stick to NURBs curves for the controls, but I decided to mix and match. I'm experimenting with doing super-low-poly versions of the limbs instead of control curves because they are easier to spot and easier to click on. The arrow control curves were objects that I created quickly in Illustrator, saved as Illustrator 10 files for compatibility, then imported into Maya


With the control objects built, I now need to hook them up. The IK controls will be a little tricky, but FK controls are about as straightforward as you can get. However, connecting everything by hand takes a long time, so I wrote a little script to speed things up. All I have to do is select my control object, the joint I want to connect it to, and run the script. What it gives me is a control surface completely oriented to the joint with all its translation, rotation, and scale channels zeroed out. This gives the animator a nice, clean base to start with.

In all, getting to this point has taken me about a day and a half, and I loved every minute of it. I spent almost my entire weekend working this up because that's what I like to do. I'll post more shots as I finish it up. Also, go check out the Angels Fall First site! It's got a lot more cool stuff to look at!

Thursday, January 27, 2011

Obsessions

It feels good to be coding again. Minecraft quickly turned into an addiction, which I have curbed by turning it into a project. I'm writing a Python script that converts Minecraft's world save data into Maya scenes.

When I was looking for Minecraft wallpaper for my desktop, I discovered an image where someone had taken Minecraft's level data and exported it to a different game engine, then used the game engine to export an OBJ to Blender. The final render looks like this:


I was blown away, but I quickly discovered that their method was quite specific to their software and, more importantly, Mac-only.

My script is still in the rough stages, but much of the basic functionality is there. It can open the .DAT files in which Minecraft stores its world chunks, strip out the section about what kind of blocks make up the chunk, then use that data to re-create the chunk inside of Maya. The end result looks like this:


It's an ugly pile of dirt, but it's a start. The blurry stuff on the top is water, and the various colored blocks are the different materials that make up the chunk. In the end, the script should create a set of geometry like this, as well as a proxy model, save to a file, then reference all the completed chunks into a central map scene.

I also have a list of features I'd like to add:
1) A shell mode where blocks that cannot be seen will not be created. Each chunk is 16 blocks wide, 16 blocks deep, and 128 blocks tall. That comes out to 32768 blocks per chunk...
2) A way to generate better water geometry. In the end, this may just have to be put in manually using planes.
3) UV layout and assignment to use the in-game textures.
4) Automatic lighting creation and placement for things like torches, lava, glowstone, etc.

I'm having a lot of fun with this. It's the biggest technical challenge I've had to tackle, and it's been a rewarding experience.

Tuesday, April 6, 2010

I'm a tool (writer)

Things are getting pretty busy. The film is due for marks on Friday, and I'm busy trying to get something patched together for marks. To help try to meet that, I took some time today to write a little pair of tools to get me working faster.

The UDK has a nifty command switch called "dumpmovie" which forces it to save every rendered frame to the screenshots folder. In combination with the "fps XX" switch (where XX is the number of frames per second), it essentialy performs like a batch render in Maya, except there's not automatic off. Instead, it plays in a game window, and stops recording when you exit the game. Of course, the options with this are very limited. You can't (as far as I'm aware) set the path for the screenshots, and it only saves in BMP format, but it works, and that's what's important. Since BMPs are uncompressed, they take up a lot of space. A 120-frame render weighs in just over 300Mb. With WinRAR, I can collect and compress those 120 frames into a single 20Mb RAR file. That's about a 93% storage savings.

With those facts in mind, here was my workflow for rendering out a scene:
  1. Save final map and assets in UDK, then close editor.
  2. Open command prompt and type in really long UDK shell command to start a Dumpmovie render. (example: C:\UDK\UDK-2010-03\Binaries\Win32\UDK MapName -dumpmovie -benchmark -fps 24 -resx=1280 -resy=720)
  3. Render out scene.
  4. Open Explorer to the UDK screenshots folder.
  5. Select all new rendered frames.
  6. Right click, "Add to archive."
  7. Set up WinRAR options.
  8. Delete leftover frames.
Not optimal at all.

So instead, I wrote two simple batch files. One does the rendering side, the other runs the archiving. The rendering one also has the option of calling the archiver as soon as the render finishes. This is my new workflow.
  1. Run UDK_Render.bat.
  2. Give map name, choose resolution (full or half 720p).
  3. Run render.
  4. Choose to archive (or not).
  5. Give archive name.
  6. Done.
This leaves me with a screenshots folder that has nicely organized archives for each shot, plus it deletes the source files after creating the archive, so the screenshot folder is clean and primed for the next render. This also makes it very easy extract each archive into its own folder to prep for rendering out an uncompressed AVI from AfterEffects so I can then throw it into Premiere for editing.

As a side note for comparing UDK render time against Maya: If we assume Mental Ray is rendering at 5 frames/minute and UDK at 15 frames/sec, the ratio is 4500:1!!
Render time essentially becomes a non-issue. I could render my entire film (if it were contained in a single map), check for errors, tweak the map, and re-render in about the time it would take MR to render 3-5 frames. This by itself is one of my major arguments for using real-time rendering engines (like game engines) for rapid film production work.

Tuesday, February 23, 2010

I love solutions

I figured I'd break up the last post into two parts to avoid TL;DR syndrome.

FUN PROBLEMS
Today my friend Andrew posed me with an interesting problem: He was working on a scene with a relatively large number of complex character rigs (high polycounts combined with lots of lattice deformers), and he chewed up all of his RAM. This killed Maya, and somehow corrupted his file. This raises two interesting points with solutions I enjoy. First, saving often and making backups. I am terrified of losing my progress and work, so I like to have as many safety nets as possible.

My favorite solution for giving me peace of mind is source control. I have a modest Ubuntu box sitting under my desk running Subversion, and my laptop and work machine both have TortoiseSVN for Windows. It's great because it's easy to keep both machines up-to-date, and I feel much safer knowing that a broken file is only a few clicks away from reversioning to a working file. As an added bonus, I've set my machines to be accessible from any point on campus (password protected of course), so I don't have to lug around a bulky external hard drive. I have never had to actually use the safety net features of my setup, but I am willing to take more risks knowing that, failing a total system meltdown, I can always go back to an earlier version.

The second solution Andrew's situation brings up is proxies. I haven't done much exploration with proxies, but the concept seems highly useful, and I plan to learn more about them. In general terms, referencing files in Maya allows you to pull in assets from other scenes (like character rigs or environment elements) and use them without fear of accidentally breaking them in some way. Also, going back to that compartmentalization I mentioned in my last post, it gives flexibility to edit the original asset file, with changes being reflected in the new scene without needing any user interference short of a reference reload. The problem with referencing is that scenes can often eat up tons of RAM (what with rigs, smooth skins, deformers, textures, etc...), and that's where proxies come it.

From what little fiddling I've done with them, proxies allow you to create low-resolution versions of your assets and have them stand in for the more complex ones. Low-res is, of course, a wide term. It could be anything from a simpler rig with fewer controls and parented geometry chunks instead of smooth skins. It could be just a bounding box. Or it could be somewhere in-between. Whatever the case, it gives you a way to see the asset working in the scene without it taking up unnecessary resources, and, if set up properly, allows you to rough in placement/animation before switching it out with the high-res version for final tweaks. I'm still rather vague on specific implementation, but I'm looking forward to working out how to use them appropriately for smoother workflow.

Also on my list of things to figure out: Maya Trax and how well it works with planning out Matinee work in UDK.